Summary: in this tutorial, you’ll how to use the Tkinter LabelFrame widget that contains other widgets.
Introduction to the Tkinter LabelFrame #
Tkinter LabelFrame widget is a container that contains other related widgets. For example, you can group Radiobutton widgets and place the group on a LabelFrame.
To create a LabelFrame widget, you use the ttk.LabelFrame:
lf = ttk.LabelFrame(container, **option)Code language: Python (python)In this syntax, you specify the parent component (container) of the LabelFrame and one or more options. A notable option is text which specifies a label for the LabelFrame.
Tkinter LabelFrame widget example #
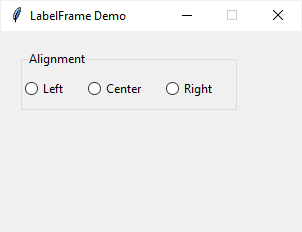
The following program illustrates how to create a LabelFrame widget that groups three radio buttons:
import tkinter as tk
from tkinter import ttk

# root window
root = tk.Tk()

# configure the root window
root.geometry('300x200')
root.resizable(False, False)
root.title('LabelFrame Demo')

# label frame
lf = ttk.LabelFrame(root, text='Alignment')
lf.grid(column=0, row=0, padx=20, pady=20)

alignment_var = tk.StringVar()
alignments = ('Left', 'Center', 'Right')

# create radio buttons and place them on the label frame

grid_column = 0
for alignment in alignments:
    # create a radio button
    radio = ttk.Radiobutton(lf, text=alignment, value=alignment, variable=alignment_var)
    radio.grid(column=grid_column, row=0, ipadx=10, ipady=10)
    # grid column
    grid_column += 1

root.mainloop()Code language: Python (python)
Output:

How it works.
First, create a LabelFrame widget and use the grid geometry manager to manage its layout:
lf = ttk.LabelFrame(root, text='Alignment')
lf.grid(column=0, row=0, padx=20, pady=20)Code language: Python (python)
Second, create the three radio button widgets based on the alignments list and place them on the label frame widget:
grid_column = 0

for alignment in alignments:
    # create a radio button
    radio = ttk.Radiobutton(lf, text=alignment, value=alignment, variable=alignment_var)
    radio.grid(column=grid_column, row=0, ipadx=10, ipady=10)
    # grid column
    grid_column += 1Code language: Python (python)
Specify the label position #
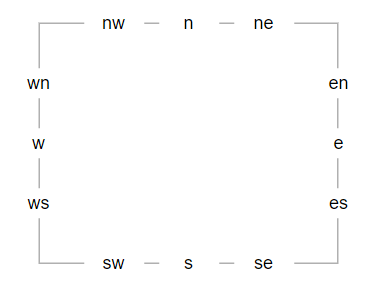
To specify the position of the label on the widget, you use the labelanchor option. The labelanchor defaults to 'nw', which places the label at the left end of the top border:

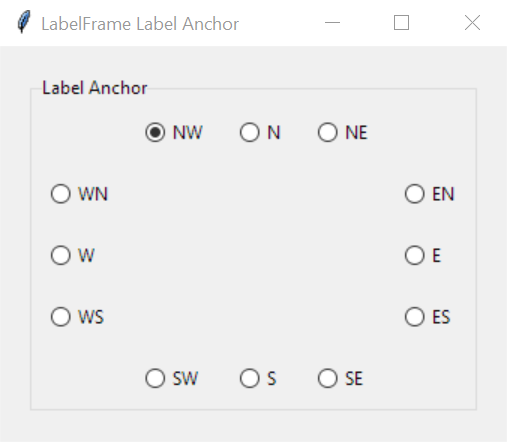
The following program illustrates the label anchor options. When you select a label option, the label of the LabelFrame widget change accordingly:

import tkinter as tk
from tkinter import ttk

# root window
root = tk.Tk()
root.title('LabelFrame Label Anchor')

# label frame
lf = ttk.LabelFrame(root, text='Label Anchor')
lf.grid(column=0, row=0, padx=20, pady=20, sticky=tk.NSEW)

anchor_var = tk.StringVar()
anchors = {
    'nw': {'row': 0, 'column': 1},
    'n': {'row': 0, 'column': 2},
    'ne': {'row': 0, 'column': 3},
    'en': {'row': 1, 'column': 4},
    'e': {'row': 2, 'column': 4},
    'es': {'row': 3, 'column': 4},
    'se': {'row': 4, 'column': 3},
    's': {'row': 4, 'column': 2},
    'sw': {'row': 4, 'column': 1},
    'ws': {'row': 3, 'column': 0},
    'w': {'row': 2, 'column': 0},
    'wn': {'row': 1, 'column': 0}
}


def change_label_anchor():
    lf['labelanchor'] = anchor_var.get()


# create radio buttons and place them on the label frame
for key, value in anchors.items():
    # create a radio button
    radio = ttk.Radiobutton(
        lf,
        text=key.upper(),
        value=key,
        command=change_label_anchor,
        variable=anchor_var
    ).grid(**value, padx=10, pady=10, sticky=tk.NSEW)

# set the radio button selected
anchor_var.set(lf['labelanchor'])

# show the root window
root.mainloop()Code language: Python (python)
How it works.
First, create a LabelFrame widget and place it on the root window:
lf = ttk.LabelFrame(root, text='Label Anchor')
lf.grid(column=0, row=0, padx=20, pady=20, sticky=tk.NSEW)Code language: Python (python)
Next, define a StringVar object that will associate with the radio buttons:
anchor_var = tk.StringVar()Code language: Python (python)Then, define a dictionary with the key stores the label options and value stores the cell (row, column) of the grid:
anchors = {
    'nw': {'row': 0, 'column': 1},
    'n': {'row': 0, 'column': 2},
    'ne': {'row': 0, 'column': 3},
    'en': {'row': 1, 'column': 4},
    'e': {'row': 2, 'column': 4},
    'es': {'row': 3, 'column': 4},
    'se': {'row': 4, 'column': 3},
    's': {'row': 4, 'column': 2},
    'sw': {'row': 4, 'column': 1},
    'ws': {'row': 3, 'column': 0},
    'w': {'row': 2, 'column': 0},
    'wn': {'row': 1, 'column': 0}
}Code language: Python (python)
After that, define a function that handles the radio button change event. The function changes the labelanchor option of the LabelFrame widget to the value of the selected radio button:
def change_label_anchor():
    lf['labelanchor'] = anchor_var.get()Code language: Python (python)
Finally, create the radio buttons from the anchors dictionary and place them on the LabelFrame widget:
for key, value in anchors.items():
    # create a radio button
    radio = ttk.Radiobutton(
        lf,
        text=key.upper(),
        value=key,
        command=change_label_anchor,
        variable=anchor_var
    ).grid(**value, padx=10, pady=10, sticky=tk.NSEW)Code language: Python (python)
Summary #
- Use
LabelFramewidget to group related widgets into one group. - Use
ttk.LabelFrame(container, **option)to create aLabelFramewidget.