Summary: in this tutorial, you’ll learn how to use the Tkinter grid geometry manager to position widgets on a window.
Introduction to the Tkinter grid geometry manager #
The grid geometry manager uses the concepts of rows and columns to arrange the widgets on a window or frame.
The following picture shows a grid that consists of four rows and three columns:
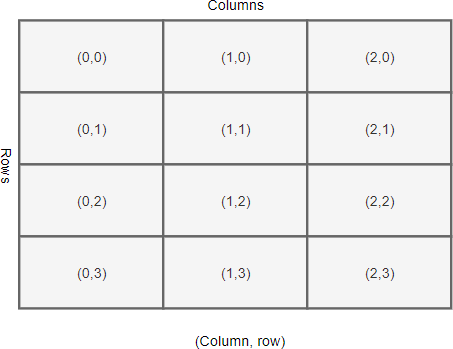
Each row and column in the grid is identified by an index. By default, the first row has an index of zero, the second row has an index of one, and so on. Likewise, the columns in the grid have indexes of zero, one, two, etc.
The indexes of rows and columns in a grid don’t have to start at zero. Additionally, indexes of the row and column can have gaps. For example, you can have a grid whose column indexes are 1, 2, 10, 11, and 12. The gaps can be useful when you plan to add more widgets in the middle of the grid later.
The intersection of a row and a column is called a cell. A cell is an area where you can place a widget. A cell can show only one widget at a time. If you place two or more widgets in a cell, they’ll be on top of each other.
To place multiple widgets in a cell, you use a container like a Frame or LabelFrame to wrap the widgets and place container on the cell.
The column’s width depends on the width of the widget it contains. Similarly, the row’s height depends on the height of the widgets contained within the row.
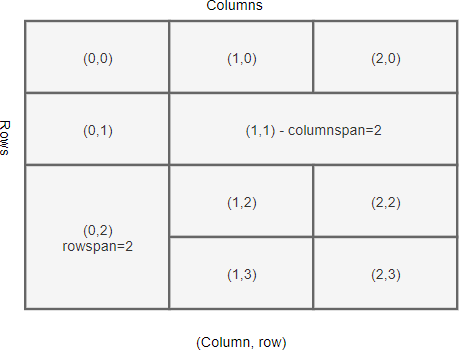
Rows and columns can span. The following picture shows a grid with the cell (1,1) that spans two columns and the cell (0,2) that spans two rows:
Setting up the grid #
Before positioning widgets on a grid, you’ll need to configure the rows and columns of the grid. Tkinter provides you with two methods for configuring grid rows and columns:
container.columnconfigure(index, weight)
container.rowconfigure(index, weight)Code language: CSS (css)
The columnconfigure() method configures the column index of a grid. The weight determines how wide the column will occupy, which is relative to other columns.
For example, a column with a weight of 2 will be twice as wide as a column with a weight of 1.
Positioning a widget on the grid #
To place a widget on the grid, you use the widget’s grid() method:
widget.grid(**options)Code language: Python (python)The grid() method has the following parameters:
| Parameters | Meaning |
|---|---|
| column | The column index where you want to place the widget. |
| row | The row index where you want to place the widget. |
| rowspan | Set the number of adjacent rows that the widget can span. |
| columnspan | Set the number of adjacent columns that the widget can span. |
| sticky | If the cell is large than the widget, the sticky option specifies which side the widget should stick to and how to distribute any extra space within the cell that is not taken up by the widget at its original size. |
| padx | Add external padding above and below the widget. |
| pady | Add external padding to the left and right of the widget. |
| ipadx | Add internal padding inside the widget from the left and right sides. |
| ipady | Add internal padding inside the widget from the top and bottom sides. |
Sticky #
By default, when a cell is larger than the widget it contains, the grid geometry manager places the widget at the center of the cell horizontally and vertically.
To change this default behavior, you can use the sticky option. The sticky option specifies which edge of the cell the widget should stick to.
The sticky has the following valid values:
| Sticky | Description |
|---|---|
| N | North or Top Center |
| S | South or Bottom Center |
| E | East or Right Center |
| W | West or Left Center |
| NW | North West or Top Left |
| NE | North East or Top Right |
| SE | South East or Bottom Right |
| SW | South West or Bottom Left |
| NS | NS stretches the widget vertically. However, it leaves the widget centered horizontally. |
| EW | EW stretches the widget horizontally. However, it leaves the widget centered vertically. |
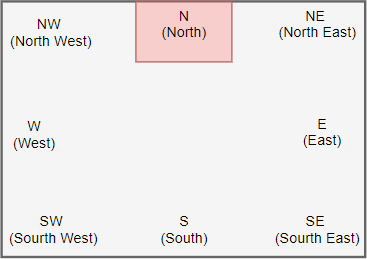
If you want to position the widget in the corner of the cell, you can use the N, S, E, and W.
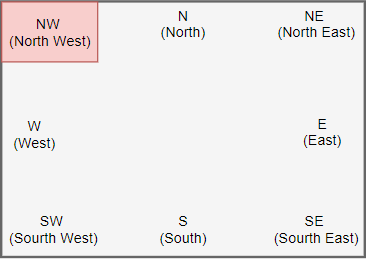
The following picture illustrates how to position a widget with the sticky option set to N:
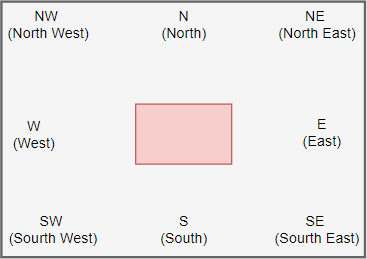
If you want to position the widget centered against one side of the cell, you can use the NW (top left), NE (top right), SE (bottom right), and SW (bottom left).
The following example shows how to position a widget with the sticky option set to NW:
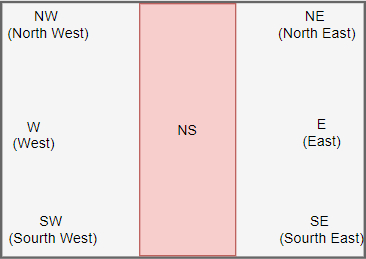
NS stretches the widget vertically. However, it leaves the widget centered horizontally:
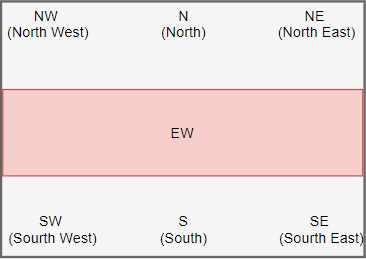
EW stretches the widget horizontally. However, it leaves the widget centered vertically:
Padding #
To add paddings between cells of a grid, you use the padx and pady options. The padx and pady are external paddings:
grid(column, row, sticky, padx, pady)Code language: Python (python)To add paddings within a widget itself, you use ipadx and ipady options. The ipadx and ipady are internal paddings:
grid(column, row, sticky, padx, pady, ipadx, ipady)Code language: Python (python)The internal and external paddings default to zero.
Tkinter grid geometry manager example #
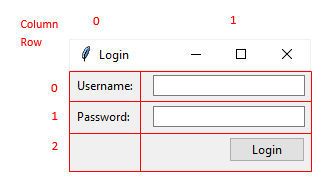
In this example, we’ll use the grid geometry manager to design a login screen as follows:
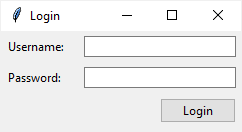
The login screen uses a grid that has two columns and three rows. Also, the second column is three times as wide as the first column:
The following shows the complete login window:
import tkinter as tk
from tkinter import ttk

# main window
root = tk.Tk()
root.geometry("240x100")
root.title('Login')


# grid 3x2
root.rowconfigure(0, weight=1)
root.rowconfigure(1, weight=1)
root.rowconfigure(2, weight=1)
root.columnconfigure(0, weight=1)
root.columnconfigure(1, weight=3)


# username
username_label = ttk.Label(root, text="Username:")
username_label.grid(column=0, row=0, sticky=tk.EW, padx=5, pady=5)

username_entry = ttk.Entry(root)
username_entry.grid(column=1, row=0, sticky=tk.EW, padx=5, pady=5)

# password
password_label = ttk.Label(root, text="Password:")
password_label.grid(column=0, row=1, sticky=tk.EW, padx=5, pady=5)

password_entry = ttk.Entry(root,  show="*")
password_entry.grid(column=1, row=1, sticky=tk.EW, padx=5, pady=5)

# login button
login_button = ttk.Button(root, text="Login")
login_button.grid(column=1, row=3, sticky=tk.E, padx=5, pady=5)


root.mainloop()
Code language: Python (python)
How it works.
First, use the rowconfigure() and columnconfigure() methods to set up a grid of 3 rows 2 columns:
root.rowconfigure(0, weight=1)
root.rowconfigure(1, weight=1)
root.rowconfigure(2, weight=1)
root.columnconfigure(0, weight=1)
root.columnconfigure(1, weight=3)Code language: Python (python)
Second, position the username label on the first column and the username entry on the second column of the first row of the grid:
username_label = ttk.Label(root, text="Username:")
username_label.grid(column=0, row=0, sticky=tk.EW, padx=5, pady=5)

username_entry = ttk.Entry(root)
username_entry.grid(column=1, row=0, sticky=tk.EW, padx=5, pady=5)Code language: Python (python)
Third, position the password label and entry on the first and second column of the second row:
password_label = ttk.Label(root, text="Password:")
password_label.grid(column=0, row=1, sticky=tk.EW, padx=5, pady=5)

password_entry = ttk.Entry(root,  show="*")
password_entry.grid(column=1, row=1, sticky=tk.EW, padx=5, pady=5)Code language: Python (python)
Finally, position the login button on the third row. Since its sticky option sets to E, the button is aligned to the right of the third row.
login_button = ttk.Button(root, text="Login")
login_button.grid(column=1, row=3, sticky=tk.E, padx=5, pady=5)Code language: Python (python)
Summary #
- Use the
columnconfigure()androwconfigure()methods to specify the weight of a column and a row of a grid. - Use
grid()method to position a widget on a grid. - Use
stickyoption to align the position of the widget on a cell and define how the widget will be stretched. - Use
ipadx,ipadyandpadx,padyto add internal and external paddings.