Summary: in this tutorial, you’ll learn how to use the PyQt QRadioButton class to create radio buttons.
Introduction to the PyQt QRadioButton #
The QRadioButton class allows you to create a radio button with a label:
QRadioButton(text[, parent=None])Code language: Python (python)A radio button has two states:
- on (checked)
- off (unchecked)
Typically, you use radio buttons in a group. A radio button group provides you with one of many choices.
In a radio button group, you can check only one radio button at a time. If you check another radio button, the previously checked button is unchecked.
By default, radio buttons are auto-exclusive. Also, radio buttons that belong to the same parent widget, are auto-exclusive.
If you want to create multiple exclusive radio buttons, you can group them into multiple QButtonGroup widgets.
A radio button emits the toggled() signal when it is switched on or off.
If you want to trigger an action when the state of the radio button changes, you can connect a slot to the toggled() signal.
Inside the slot, you can use isChecked() method to check whether the radio button is switched on or off.
PyQt QRadioButton example #
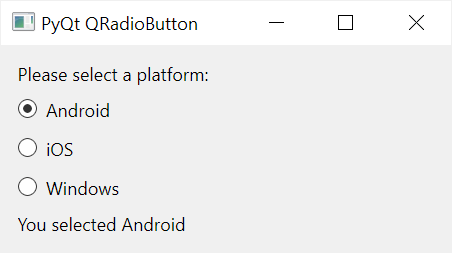
The following program illustrates how to create a radio button group:
import sys
from PyQt6.QtWidgets import QApplication, QWidget, QRadioButton, QLabel, QVBoxLayout
from PyQt6.QtCore import Qt


class MainWindow(QWidget):
    def __init__(self, *args, **kwargs):
        super().__init__(*args, **kwargs)

        self.setWindowTitle('PyQt QRadioButton')
        self.setMinimumWidth(300)

        # create a grid layout
        layout = QVBoxLayout()
        self.setLayout(layout)

        label = QLabel('Please select a platform:', self)

        rb_android = QRadioButton('Android', self)
        rb_android.toggled.connect(self.update)

        rb_ios = QRadioButton('iOS', self)
        rb_ios.toggled.connect(self.update)

        rb_windows = QRadioButton('Windows', self)
        rb_windows.toggled.connect(self.update)

        self.result_label = QLabel('', self)

        layout.addWidget(label)
        layout.addWidget(rb_android)
        layout.addWidget(rb_ios)
        layout.addWidget(rb_windows)
        layout.addWidget(self.result_label)

        # show the window
        self.show()

    def update(self):
        # get the radio button the send the signal
        rb = self.sender()

        # check if the radio button is checked
        if rb.isChecked():
            self.result_label.setText(f'You selected {rb.text()}')


if __name__ == '__main__':
    app = QApplication(sys.argv)
    window = MainWindow()
    sys.exit(app.exec())Code language: Python (python)
Output:

How it works.
First, create three radio buttons and connect the update method to the toggled() signal of each button:
rb_android = QRadioButton('Android', self)
rb_android.toggled.connect(self.update)

rb_ios = QRadioButton('iOS', self)
rb_ios.toggled.connect(self.update)

rb_windows = QRadioButton('Windows', self)
rb_windows.toggled.connect(self.update)Code language: Python (python)
Second, create the result label that will display which radio button is checked:
self.result_label = QLabel('', self)Code language: Python (python)Because we need to reference the result_label in another method, we make it an attribute of the class.
Third, define the update() method:
def update(self):
    # get the radio button the send the signal
    rb = self.sender()

    # check if the radio button is checked
    if rb.isChecked():
        self.result_label.setText(f'You selected {rb.text()}')Code language: Python (python)
In the update() method:
- Find the radio button that sent the toggled signal.
- Check if the radio button is checked by calling the
isChecked()method. - Update the result label. To get the text label of the radio button, we use the
text()method.
Summary #
- Use the PyQt
QRadioButtonclass to create a radio button. - Radio buttons that belong to the same parent belong to an auto-exclusive group.
- Connect to the
toggled()signal to trigger an action when the radio button is switched on or off. - Use the
isChecked()method to see if the radio button is switched on.